Increase your focus: Three ways to put macOS “Do Not Disturb” at your fingertips

DND-macOSIf you’re not activating “Do Not Disturb” at least a few times a day and really focusing on what you’re doing, you probably aren’t being as productive as you could be. In my experience, it’s nearly impossible to get any work of consequence done without blocking out distractions for discrete blocks of time.

The problem is that it is sometimes hard to predict when those blocks of time are going to be. You might be on an important call, reading an article, or in the middle of presenting when a barrage of Slack, Messages, email, or software update notifications begin competing for your attention. The faster you can activate “Do Not Disturb” (henceforth known as DND) and get back to the task at hand, the more productive you will be throughout the day.

By default, macOS provides two ways to toggle DND:

  1. Invoke Notification Center, scroll up (I hate that this control is hidden by default), then click the DND toggle.
  2. Option + click on the notification icon (the rightmost icon in your menu bar). When it’s dimmed, DND is activated.

While the option + click shortcut is convenient (and works right out of the box), below are three ways to put DND right at your fingertips to help make transitioning into a distraction-free workflow as rapid and fluid as possible.

1. Add the DND toggle to your Touch Bar

If you have a modern Macbook Pro, the easiest way to make DND easily accessible is to add the toggle to your Touch Bar. You can customize your Touch Bar by navigating to:

System Preferences > Keyboard > Keyboard (tab) > Customize Touch Bar… (button)

Just drag the crescent moon icon down, and you’re all set. But if you don’t have a Touch Bar, and/or if you favor an external keyboard (like I do), there are other options.
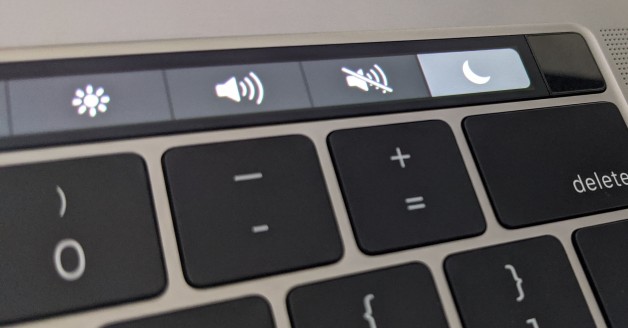
touch-bar-edited

2. Create a global keyboard shortcut

No third-party apps necessary. Just navigate to:

System Preferences > Keyboard > Shortcuts (tab) > Mission Control (list)

Check the box next to “Turn Do Not Disturb On/Off” and assign it a keyboard combination. I use ⌥D (option + D).

keyboard-shortcut

3. Put that extra mouse button to use

If you use an external, non-Apple mouse, you might be able to map an unused button to toggle DND. I like Logitech mice which work well out of the box, but if you install the Logitech Options utility application, you not only get the ability to customize the behavior of the mouse, but you can also remap buttons. While you can’t map a button directly to the DND toggle, you can map it to the global keyboard shortcut we set up in Step 2.

I don’t use mouse “gestures,” so I always map the gesture button to ⌥D. That means whether I’m typing or scrolling, I’m never more than a quick flick away from quelling distracting notifications and regaining my focus.

logitech-options

Make distraction the exception rather than the rule

Unfortunately, technology has evolved such that distraction is the default. In other words, out of the box, apps and devices are maximally permissive about notifications, alerts, and other forms of interruptions. But if you want to take back as much of your time and focus as possible, you can do what I did: make distraction the exception rather than the rule.

Instead of choosing discrete periods of time throughout the day when I want to focus, I have made DND the default in my life, and set aside time for things like Slack and email. Additionally, I use the shortcuts described above to opt in to periods of time when I’m willing to be disturbed. Office hours, you might say. Fortunately, this is possible with macOS by scheduling DND. Just navigate to:

System Preferences > Notifications > Do Not Disturb (list)

mac-notification-preferences

Everything there is to know about texting from the desktop (and why it’s so much easier on iOS than Android)

pc_messaging_640It’s happened to all of us. While sitting in front of our ultra-powerful, multi-thousand-dollar laptops, we’ve reached for our phones to send or read a text.

Think about that for a second: instead of applying the veritable supercomputers in front of us to the task of transmitting a few bits-worth of emoji — machines, incidentally, with obscene connectivity, full keyboards, mice/trackpads, and excellent spell checking — we’ve opted instead to pick up a phone, biometrically unlock it, open a messaging app, and risk autocorrect humiliation while laboriously tapping out a dispatch with less efficiency than a nineteenth-century telegraph operator. Then: lock phone, set down, complete approximately twenty additional seconds of work, and repeat.

For some of us desktop texters, such onerous workflows are a thing of the past — anecdotes to be passed down to our children and grandchildren in futile attempts to make them appreciate the extravagance of modern life. But for others, the loathsome cycle is seemingly unbreakable.

If you bask in the privilege of texting from both your desktop and your phone interchangeably, chances are you are an iOS and Mac user who has discovered the brilliance of Apple’s Continuity. Or you’ve allowed yourself to be subjugated by a more closed and proprietary messaging platform like Facebook Messenger. A few of you might even be Android users who cling to the false hope of Google Voice, or who have sworn lifelong allegiance to Nexus devices for the privilege of testing Project Fi.

What follows are all the ways I know of to text from both your desktop and your phone, along with the pros and cons of each approach. If you are already intimately familiar with the problem and you’re just here for a solution, skip ahead to the “Apple Messages” section and go from there. But if terms like “text” and “iMessage” sound to you like distinctions without differences, you might want to start with the glossary below.

Continue reading

My Current Keyboard Configuration

my_keyboard_configurationThe picture above is one of my home workstations where I think I’ve finally gotten the right keyboard/pointer configuration. Here’s what you’re looking at:

  • The black keyboard on the bottom is a Filco Majestouch mechanical keyboard with MX Cherry Brown switches (review with video here). This is what I use for most of my typing. The Alt and Windows keys have been swapped and Alt and Command remapped in software to make it more Mac friendly.
  • The keyboard above it is an Apple bluetooth keyboard. I use it for typing when I’m in virtual meetings in order to keep the noise down (it’s very quiet while the mechanical keyboard is way too loud for meetings), and for its media keys (volume up, volume down, and mute). (If you want media keys on your non-Apple keyboard, see this post by Grant Skinner.)
  • The mouse is an Apple Magic Mouse. Mice are very personal objects which people feel strongly about, so I’m not going to claim that it’s the best. In fact, I have a few Logitech mice which are equally good if not better. But I enjoy the accuracy and the gestures of the Magic Mouse enough that I’ve stuck with it. (In my opinion, this is the first mouse Apple has ever made that’s usable.)
  • The trackpad beside the top keyboard is the Apple Magic Trackpad. I use it for gestures and sometimes for scrolling. I also sometimes connect the bluetooth keyboard and trackpad or mouse to my phone.
  • The phone is a Galaxy Nexus. I usually have my iPhone 4S beside it, but I used it to take the photo. I rely on them for notifications. Rather than having alerts pop up on my monitor all the time and distract me, I use my phones for email, calendar, and text notifications. (I have two phones because I do mobile development — and because I love them both.)
  • I have an Energizer family sized battery charger off to the side to keep the keyboard and pointing devices powered. I find I’m swapping out batteries about every two weeks.

I have two other workstations: one for Windows, and one at the office. They’re both different just to mix things up a bit, so maybe I’ll get pictures of them at some point, as well.

How to Maximize Safari

Short Answer

To “maximize” Safari (to make the window fill up the entire monitor rather than resize to fit the current content), drag the link below into your bookmark bar, then click it. Note that it only works when you have a single document open, so use it before opening additional tabs.

Maximize

Longer Answer (With More Background)

Mac users know how unpredictable the “zoom” button (green “+” button in the top left-hand corner) can be. In iTunes, it toggles between a mini-player mode, and a standard display mode; in Safari, it resizes the window to fit the content in the current tab; in Mail.app, it operates just like the maximize button on Windows. Rather than being consistent across applications, the behavior of the zoom button is determined by the application developer.

I use both Firefox and Safari frequently, and I often find it annoying that the zoom button works differently across the two browsers (in Firefox, zoom maximizes the window as it would on Windows). I find that I seldom need Safari automatically resized to fit the content I’m viewing, and would much rather it maximize the window to the full size of the monitor, so I created a bookmarklet to do just that.

A bookmarklet is a link that can be dragged into your bookmark menu. Rather than going to a website when clicked, however, it will execute a line of JavaScript to perform some simple function. For instance, I use a bookmarklet for adding links to delicious, and for searching Wikipedia. And now I have a bookmarklet for maximizing Safari.

To use this bookmarklet, simply drag the link below into your bookmark menu:

Maximize

The only limitation of the maximize bookmarklet is that it won’t work if Safari has more than one tab open in the current window. Therefore, you should use it as soon as you open Safari, or open a new additional window before using it.

How to recover from a screen saver that crashes on OS X

I discovered the hard way that a few of the screen savers that come with OS X actually crash (at least on my machine) which means just trying to select them in "Desktop & Screen Saver" crashes System Preferences. If you’re unlucky enough to have System Preferences save the selection before it crashes (as I was), that means your screen saver will not work, and you cannot change it because each time you try, System Preferences will crash. Bad situation.

The fix, I discovered after some trial and error, is to:

  1. Open the terminal.
  2. cd into ~/Library/Preferences/ByHost.
  3. rm com.apple.screensaver.*.plist.

For extra credit, you can just remove the relevant plist file with the newest modification date which will reflect the moment you got yourself into this mess.

As a side note, I actually don’t even like screen savers, and prefer to use the "Energy Saver" option to simply turn off my display(s). The problem, however, is that you can’t configure OS X to require a password when the displays come back on. If you want to protect your workstation while you’re away, you have to configure your screen saver to activate at a shorter interval than your displays turn off.

Dear Apple: please add a password option to turning off displays so we can be energy conscious and security conscious at the same time.