 If you’re not activating “Do Not Disturb” at least a few times a day and really focusing on what you’re doing, you probably aren’t being as productive as you could be. In my experience, it’s nearly impossible to get any work of consequence done without blocking out distractions for discrete blocks of time.
The problem is that it is sometimes hard to predict when those blocks of time are going to be. You might be on an important call, reading an article, or in the middle of presenting when a barrage of Slack, Messages, email, or software update notifications begin competing for your attention. The faster you can activate “Do Not Disturb” (henceforth known as DND) and get back to the task at hand, the more productive you will be throughout the day.
By default, macOS provides two ways to toggle DND:
- Invoke Notification Center, scroll up (I hate that this control is hidden by default), then click the DND toggle.
- Option + click on the notification icon (the rightmost icon in your menu bar). When it’s dimmed, DND is activated.
While the option + click shortcut is convenient (and works right out of the box), below are three ways to put DND right at your fingertips to help make transitioning into a distraction-free workflow as rapid and fluid as possible.
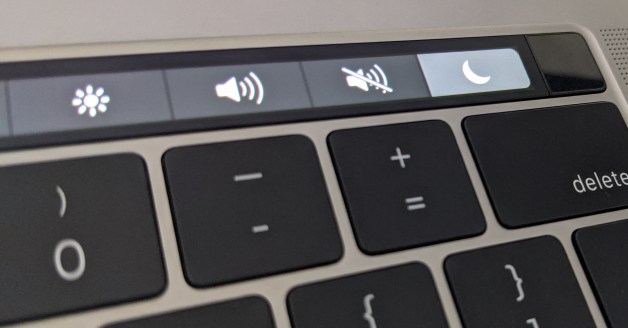
1. Add the DND toggle to your Touch Bar
If you have a modern Macbook Pro, the easiest way to make DND easily accessible is to add the toggle to your Touch Bar. You can customize your Touch Bar by navigating to:
System Preferences > Keyboard > Keyboard (tab) > Customize Touch Bar… (button)
Just drag the crescent moon icon down, and you’re all set. But if you don’t have a Touch Bar, and/or if you favor an external keyboard (like I do), there are other options.
2. Create a global keyboard shortcut
No third-party apps necessary. Just navigate to:
System Preferences > Keyboard > Shortcuts (tab) > Mission Control (list)
Check the box next to “Turn Do Not Disturb On/Off” and assign it a keyboard combination. I use ⌥D (option + D).

3. Put that extra mouse button to use
If you use an external, non-Apple mouse, you might be able to map an unused button to toggle DND. I like Logitech mice which work well out of the box, but if you install the Logitech Options utility application, you not only get the ability to customize the behavior of the mouse, but you can also remap buttons. While you can’t map a button directly to the DND toggle, you can map it to the global keyboard shortcut we set up in Step 2.
I don’t use mouse “gestures,” so I always map the gesture button to ⌥D. That means whether I’m typing or scrolling, I’m never more than a quick flick away from quelling distracting notifications and regaining my focus.

Make distraction the exception rather than the rule
Unfortunately, technology has evolved such that distraction is the default. In other words, out of the box, apps and devices are maximally permissive about notifications, alerts, and other forms of interruptions. But if you want to take back as much of your time and focus as possible, you can do what I did: make distraction the exception rather than the rule.
Instead of choosing discrete periods of time throughout the day when I want to focus, I have made DND the default in my life, and set aside time for things like Slack and email. Additionally, I use the shortcuts described above to opt in to periods of time when I’m willing to be disturbed. Office hours, you might say. Fortunately, this is possible with macOS by scheduling DND. Just navigate to:
System Preferences > Notifications > Do Not Disturb (list)

