Review of Google WiFi

google_wifi_on_desk

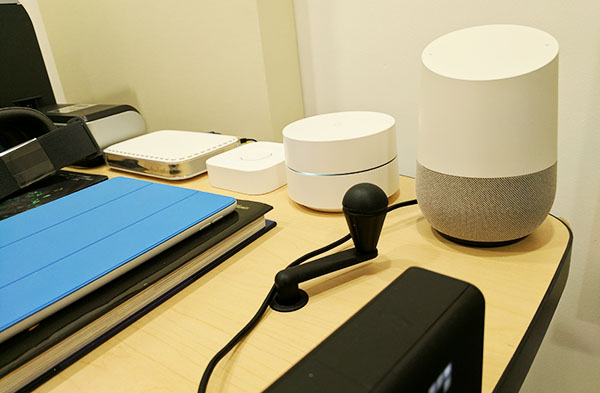
About 2,800 square feet over three floors. Usually around 25 devices connected at any given time. Only one wifi router which can’t be moved due to where the cable enters the house.

This is clearly a job for Google Wifi.

google_wifi_devices

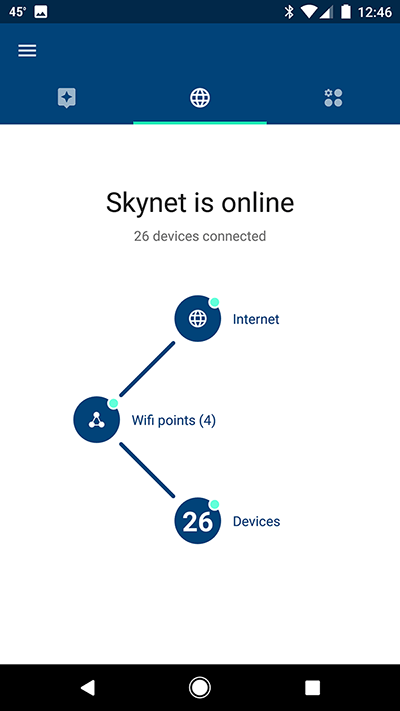
In addition to eradicating humanity, Skynet must keep dozens of my devices reliably connected to the internet.

I switched from an Apple AirPort Extreme to a Google OnHub router about a year and a half ago, and while I didn’t like it very much at first, a steady cadence of software upgrades improved it to the point where I was glad I switched. When Google Wifi came out late last year, and I found out that I could use mesh networking to extend the range of my OnHub, I pre-ordered a three-pack right away.

Mesh networking is relatively simple in theory, but in practice, robust mesh networks are complex. Mesh networks obviate the need to have multiple wifi routers with hardwired connections throughout your home or office. Instead, routers create individual, overlapping zones of coverage capable of relaying network traffic through their peers back to a single hardwired connection. Devices connect to whichever node has the best signal and/or the least amount of congestion, and then traffic is routed through the mesh, to your primary wifi point (the one with the actual connection to the internet), and then back again to the device — entirely seamlessly. Not only can mesh networks dramatically extend the range of your network without requiring you to run additional cables (all they need is power), but they are also extremely durable and robust since the network can route around any problematic nodes which may be temporary unavailable due to software updates or malfunctions.

I’ve had Google Wifi set up for a couple of weeks now, and I’d say that I’m generally happy with the results — though with some qualifications. Here are my overall thoughts so far:

Setup was relatively easy, but surprisingly time-consuming. The first thing you do is install the Google WiFi app on your phone (I used a Google Pixel XL), and then you follow a set of simple instructions which generally involve connecting a Google Wifi device to power (reversible USB Type-C!), scanning a QR code on the bottom, and waiting. And then waiting some more. And then, while you’re at it, doing a little waiting.

google_wifi_animation

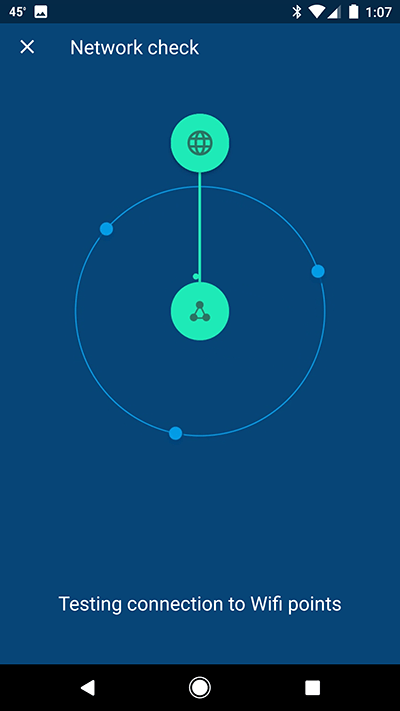
Setting up Google Wifi means plenty of waiting. But also plenty of cool animations to mesmerize you in the process.

If the process goes smoothly, your patience is rewarded with a fairly painlessly upgraded network. However, the process rarely went smoothly for me. There were software updates, unexplained errors, and worst of all, ambiguous results. (I was told setup didn’t complete properly, yet the device seemed to be functioning. What do I do? Leave it alone and hope for the best? Perform a factory reset and start again? No way to know.)

google_wifi_test_error

When setting up Google Wifi, be prepared for a few bumps along the path toward Wifi Utopia.

Not counting the time it took me to run out to Best Buy so I could replace a surge protector I discovered was blown, it took about an hour from the time I opened the three-pack of Google Wifi devices to the time I had every corner of my home awash in a beautiful overlapping patchwork of 2.4 and 5GHz spectrum. Not too bad.

google_wifi_test_results

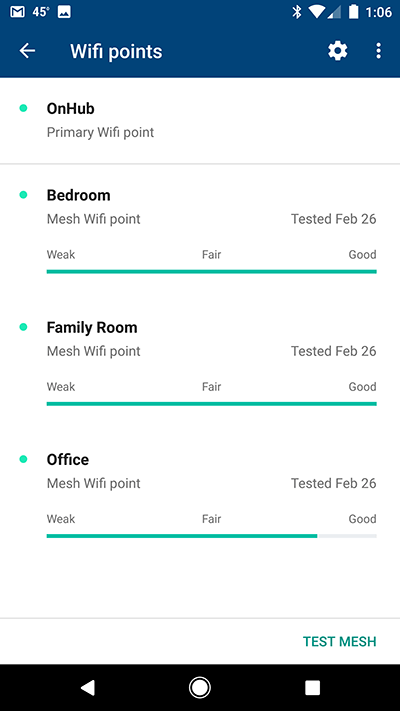
A healthy mesh network, powered by Google Wifi. The primary node — in my case, an OnHub — is not pictured in this view.

If the story ended there, my review would have been as glowing as the Google Wifi’s Cylon-like LED diagnostic strip. But sadly, the tale continues.

We have very reliable power where I live, but during a recent and particularly energetic thunderstorm, it flickered a few times. Every device in my house is plugged into a high-quality surge protector and/or a UPS so nothing was damaged, but none of my Google Wifi devices came back up properly. Both my modem and my OnHub wifi router recovered just fine, but all my Google Wifi nodes were pulsating red.

To make a very long story short, using the Google Wifi app to restart them fixed two of the three, but the third — the one closest to the network drop — wouldn’t reconnect. And then, after a factory reset, I kept being told that it couldn’t connect to my network because it was out of range of my primary wifi point (it was not). Acting purely out of instinct, I factory reset all three devices, and re-added them again one-by-one (the one closest to the primary router first). After a great deal of waiting and a few more unexplained errors (mostly failed tests), all three devices were back online, and my mesh network was restored to its former glory.

google_wifi_points

Happy and healthy once again.

For a network that is supposed to be highly durable, I was pretty disappointed that I had to spend about an hour and a half trying to bring it back up after a fairly routine power flicker. And while I feel the quality of my network justifies the time I put into it, I can’t imagine how someone without early-adopter patience would have handled both the initial setup process, and then having to set everything up again a week later. (Actually, I can imagine it, and it looks a lot like several frustrating hours on the phone with support.)

In other words, Google Wifi currently meets my expectations and standards, but it does not pass the “parents” test. (If you buy this for your parents, or recommend they buy it for themselves, be prepared to provide plenty of tech support.)

If you have clear wifi-hypoxic zones in your home, and if you have the patience to deal with a system that clearly still has some bugs to work out, then I definitely recommend that you give Google Wifi a try. I consider $299 (for a three-pack) a reasonable price to pay for sophisticated networking equipment that solves a very real problem without having to run any additional cables throughout your home.

But unless you have a very clear need for something like Google Wifi, I would recommend waiting. Consumer-grade mesh networking is still relatively new, and while $299 isn’t bad ($129 for a single device), as with most new technology, the longer you wait, the cheaper it becomes — but more importantly, the less of your precious time it will demand.

Update (3/27/2017): My experience with customer support, and all connection issues finally resolved.

Continue reading

Attempting to Grow the Ghost Orchid

ghost

Now that I’ve had some success with Dracula orchids, I’ve decided to take on a new challenge. In fact, this might actually be the challenge when it comes to orchid growing: Dendrophylax lindenii, better known as the ghost orchid.

Ghosts only grow in humid, swampy forests in Florida, Cuba, and the Bahamas, and are classified as endangered. In fact, there are only about 2,000 left in all of Florida, and the locations of most of the best specimens are kept secret in an attempt to prevent poaching.

Replicating the conditions of a swamp in southern Florida isn’t easy. Ghosts typically need:

  • Very high humidity (I’m trying an average of about 80%). That’s a little lower than Dracula orchids, but still much higher than what most orchids require.
  • Warm temperatures during the day with a 10-15 degree decrease at night.
  • Very bright light (at least 3,000 foot-candles). Rather than leaves, ghosts photosynthesize through their roots, so they thrive in relatively bright environments.
  • Reduced airflow. (Swamps tend to be stagnant.)
  • A mount they can attach themselves to, and that will not decay significantly over time since it isn’t possible to transfer ghosts to new mounts once established.

What I find most challenging about ghosts is their limited palette for expression. Becoming a good grower of orchids (or any other type of plant) means observing tiny changes in behavior, sometimes over long periods of time, as expressed primarily through leaves, roots, stems, and blooms. However, ghost orchid seedlings have tiny roots, no leaves, obviously no blooms, and a dramatically reduced stem. And if that’s not challenging enough, they’re naturally very slow-glowing. That means by the time you’re able to observe a problem, it might very well be too late to correct for it.

I got my first ghost at the beginning of the year, and I’d classify it as “stable” (certainly healthy, but barely growing). I used to have two, but the second one I ordered was damaged in transit when it was delayed due to a snow storm and exposed to freezing temperatures for too long (they should be shipped with a chemical heat pack during the winter; this one was not). Now the trick will be to make small adjustments in light, humidity, temperature, fertilizer, etc. until I see it start to thrive.

Many updates to come (hopefully).

Become a master of public radio with NPR Ninja

Being both a news junkie, and a big fan of NPR, I decided to put together a little utility that I call NPR Ninja to help me track topics that interest me, and search for stories on specific topics. It’s a client-side (JavaScript) application that leverages NPR’s open APIs.

Now that there’s also an NPR One API, I might just add some hooks into it one of these days, as well.

Growing Dracula Orchids

dracula_terrarium_small

My own little high-altitude, South American cloud forest.

I’ve been casually growing orchids for a few years now, but things got more serious in October when I decided to take on Dracula orchids (often called “monkey-face orchids” because many of the blooms resemble little faces). Draculas are not “windowsill” orchids because they have very specific environmental requirements. Most grow in high-altitude, South American cloud forests which means they need:

dracula_olmosii_bloom_profile_small

My first Dracula orchid bloom.

  • Extremely high relative humidity (at least 90%).
  • Warm temperatures during the day (in the 70s or 80s), and cold temperatures at night (in the 50s).
  • “Full shade” which means a fair amount of light (1,000 – 1,5000 foot-candles), but not direct sunlight.

If those weren’t challenging enough conditions, half my collection blooms from below rather than above which means they need to be potted in baskets and suspended rather than arranged on a shelf. In other words, these are some of the most difficult orchids to grow in completely artificial, indoor conditions. (I actually have a couple of orchids that are proving even more difficult, but I’ll save those for another post).

Once I feel I have the process of growing Dracula orchids in a terrarium perfected, I’ll write a detailed article accompanied by a video. But for now, I want to report that I am having some very solid success. Not only am I seeing new growth with all my Dracula orchids, but my Dracula olmosii just bloomed. I’m particularly proud of the olmosii because it was nearly dead when I got it, having spent several months in a greenhouse that was far too hot.

I think it’s really interesting that the orchid that was in the worst condition when I got it was also the first to bloom.

dracula_olmosii_bloom_bottom_small

Peek inside the bloom of a Dracula olmosii orchid and you’ll find a little face peeking back out at you.

Everything there is to know about texting from the desktop (and why it’s so much easier on iOS than Android)

pc_messaging_640It’s happened to all of us. While sitting in front of our ultra-powerful, multi-thousand-dollar laptops, we’ve reached for our phones to send or read a text.

Think about that for a second: instead of applying the veritable supercomputers in front of us to the task of transmitting a few bits-worth of emoji — machines, incidentally, with obscene connectivity, full keyboards, mice/trackpads, and excellent spell checking — we’ve opted instead to pick up a phone, biometrically unlock it, open a messaging app, and risk autocorrect humiliation while laboriously tapping out a dispatch with less efficiency than a nineteenth-century telegraph operator. Then: lock phone, set down, complete approximately twenty additional seconds of work, and repeat.

For some of us desktop texters, such onerous workflows are a thing of the past — anecdotes to be passed down to our children and grandchildren in futile attempts to make them appreciate the extravagance of modern life. But for others, the loathsome cycle is seemingly unbreakable.

If you bask in the privilege of texting from both your desktop and your phone interchangeably, chances are you are an iOS and Mac user who has discovered the brilliance of Apple’s Continuity. Or you’ve allowed yourself to be subjugated by a more closed and proprietary messaging platform like Facebook Messenger. A few of you might even be Android users who cling to the false hope of Google Voice, or who have sworn lifelong allegiance to Nexus devices for the privilege of testing Project Fi.

What follows are all the ways I know of to text from both your desktop and your phone, along with the pros and cons of each approach. If you are already intimately familiar with the problem and you’re just here for a solution, skip ahead to the “Apple Messages” section and go from there. But if terms like “text” and “iMessage” sound to you like distinctions without differences, you might want to start with the glossary below.

Continue reading

Negative Proof

negative_proof

My most recent short story, Negative Proof, is unabashedly about gun violence. But it does not revolve around the politics of the Second Amendment. Nor is it a thinly veiled parable endorsing or condemning gun legislation. Instead, it’s the story of a journalist who — through an unexpected gift from a controversial philosophy professor — discovers an extraordinary way to turn seemingly irremediable personal tragedy into hope and inspiration.

Negative Proof is for all those whose lives have been touched by senseless and preventable gun violence.

Birdbath Hack


bird_bath

My kids love watching birds in the backyard, so I decided to put up a bird feeder and install a birdbath. Bird feeders are relatively straightforward; birdbaths, I discovered, not so much.

It only took me about an hour of shopping to discover that buying a birdbath presents three general challenges:

  1. There isn’t a very good selection at most home and garden stores. I suppose birdbaths are probably pretty passé at this point — relics from our grandparents’ generation — so there wasn’t much of a selection. Which leads to the second challenge…
  2. The overwhelming majority of birdbaths we found were, in my opinion, gaudy at best, and at worst, outright unsightly. Not much available for the modern, minimalist backyard. But lest you assume an ugly birdbath is a cheap birdbath…
  3. Most high-quality birdbaths we found were somewhat pricy, ranging from $75 to over $300. It’s not that I don’t consider clean birds to be a worthwhile investment, but when you’re expecting to spend $25 – $50, that’s a fair amount of economic recalibration.

So I decided to assemble my own. The base is a $13, 9-inch, painted steel plant stand, and the bath itself is a $20, 16-inch, ceramic planter saucer similar to this one. Total cost was about $35, and so far the beta testers seem to love it. It even has the added benefit of being very convenient to clean since I can pick up the saucer, dump it out, hose it down, and refill it in about sixty seconds.

Which leads me to my next ornithological epiphany: birds are surprisingly dirty. If you decide to take on the responsibility of avian hygiene, expect to change out the bath water every few days.

And finally, if you’re curious about why birds bathe in the first place, the answer is that we’re not entirely sure, but here are some pretty good guesses.

Review of the Google OnHub From TP Link

OnHub_1

Update (1/13/2017): Although Google still sells the OnHub, it looks to me like it’s being replaced by Google WiFi. Fortunately, they work together so I can add Google WiFi devices to my network without having to replace my OnHub.

Update (5/2/2016): The OnHub now works with IFTTT (If This Than That). Looks like I’m going to be making a lot of updates to this post.

Update (4/25/2016): The OnHub now has support for guest networks. (I’m back to only having to use one router again.) You can even allow your guest network to have access to streaming devices like the Chromecast and Chromecast Audio. Thanks, Google!

Whenever Google dabbles in hardware, I pay attention. And whenever anyone claims to be rethinking not only an ubiquitous consumer electronic, but an entire customer experience, my curiosity is piqued. Google’s OnHub project is both.

I went with the model from TP Link since it was the only one available at the time I was buying, but the model from ASUS looks similar enough that I wouldn’t expect major differences. Here’s a breakdown of my experience with the OnHub so far.

Continue reading

Adobe Logo in LEGO

I was playing around with the LEGO Digital Designer app the other day, and as a quick, single-evening challenge, I decided to design and build the Adobe logo (I’m an Engineering Manager on Adobe’s Experience Design team). In order to ensure I’d be able to build it with pieces I already had, I used only the most common bricks (1×2, 2×2, 2×3, and 2×4). And, of course, it’s built for maximum rigidity.

Here’s the 3D model:

adobe_lego_logo_21

Here’s here’s how it turned out:

adobe_logo_lego_small

And finally, here’s the parts list:

Continue reading